Hello everybody, I hope you are having an amazing day today. Today, I will show you a way to prepare a distinctive dish, mama's golden recipe: basic cut-out cookies. It is one of my favorites food recipes. This time, I’m gonna make it a bit tasty. This is gonna smell and look delicious.
Mama's Golden Recipe: Basic Cut-out Cookies is one of the most favored of current trending meals on earth. It’s simple, it is quick, it tastes delicious. It is appreciated by millions daily. Mama's Golden Recipe: Basic Cut-out Cookies is something which I’ve loved my entire life. They are nice and they look wonderful.
To begin with this recipe, we must prepare a few components. You can cook mama's golden recipe: basic cut-out cookies using 5 ingredients and 24 steps. Here is how you can achieve that.
The ingredients needed to make Mama's Golden Recipe: Basic Cut-out Cookies:
- Get 55 grams Unsalted butter
- Get 100 grams Caster sugar (granulated sugar)
- Get 1 medium egg Egg
- Make ready 225 grams Cake flour
- Make ready 1 tsp Baking powder
Instructions to make Mama's Golden Recipe: Basic Cut-out Cookies:
- First, make the dough. Add sugar to room temperature butter, and blend well with a whisk. Add the beaten egg gradually and mix well.
- Add the sifted powders, and mix gently with a spatula. Flatten the dough and wrap with plastic wrap. Refrigerate for 30 minutes or more. (The dough can be frozen and stored in this state.)
- Roll the dough to about 5 mm thick. If you roll the dough between plastic wrap or parchment paper, you don't need to use flour. (If too much flour is used, it will get into the dough and ultimately cause the dough to crumble.) Cut the dough with cookie cutters of your choice.
- You can prepare the cookies up to Step 3, and freeze. Lay the cut-out dough on a tray lined with plastic wrap, and cover with a piece of plastic wrap. Just make sure that the water content does not evaporate. The frozen cookies can be baked as is. It may take a few minutes longer.
- Put the cookies on a baking sheet lined with parchment paper, and bake until golden in an oven preheated to 340ºF (170ºC). (Regular size cookies will take 10 to 14 minutes.) If you prefer glossy cookies, brush the dough with egg yolk (not listed) after setting on the baking sheet.
- Dough variations … For a chocolate dough, switch 5 g of the flour (more for a darker color) with cocoa. You can also add chocolate chips. For a matcha green tea dough, switch 1-2g of the dough (note that matcha colors very well).
- Increase the variations by adding chopped peel, poppy seeds or nuts, etc., to the plain dough.
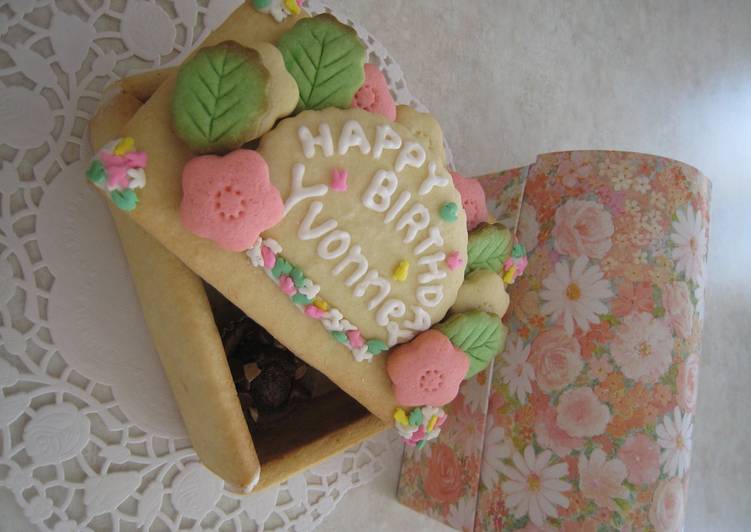
- Here are some adaptations of the design. I am still working on the finish, but here is a sweets box for chocolate candies (about 13x8x5 cm). I used exactly one recipe worth of dough.
- Decide the size and shape of the box, and make a pattern. Here, I referred to the shape of the paper box in which I would put the sweets box in. The sweets box is about 20% smaller than the paper box. The base and top of the box are large, so I poked holes with a fork at places so the cookie would bake easily and the fork holes would not stand out.
- Prepare flowers and leaves for decoration. Usually, I use natural ingredients such as matcha and cherries for children… This box is for an adult, and I wanted a simple yet "showy" finish, so I directly kneaded red and green paste coloring into the dough.
- I used a plum-shaped cutter for the flowers. For the leaves, I used a chrysanthemum cutter and cut out a thick piece of dough. Then, I rolled it thinly in one direction to make an oblong shape. I used the serrated edge of the tool (shown on lower right) to mark the center of the flower. A table knife was used to mark the leaf's veins. I placed the cutouts in the freezer once to harden the dough.
- I put the dough onto a baking sheet lined with parchment paper. I wanted a simple finish, so I did not use an egg-yolk glaze. There are various cookie sizes, so I baked the larger pieces longer, and the smaller pieces shorter. Even still, the edges of the leaves got a little burnt.
- Using icing as a glue, I nicely balanced (!?) and arranged the finished cookies! I made seasonal (rabbit and chicks for Easter) out of sprinkles and stuck them on four corners.
- This is the finished box. The cookies expand when baked, so shave the edges with a knife and finely adjust the box corners. I shaved the glued edges to about 45 degrees.
- Set the box into the paper box. I laid the sprinkles as the decorations on the bottom of the cookie box, and put chocolates inside (6 chocolate cups fit).
- Set the lid, add a handmade message, and it's ready! I was relieved that finished size was just right and the top of the paper box fit.
- These are regular cookies made with a cookie cutter. You can even use stamp-type cutters. They have a very simple finish.
- These are cookies decorated as Thank you cards. They come with a sugar paste and icing badge.
- These cookies were made into a sheet-type birthday cake decoration. The cookies will get soggy from the whipped cream, so arrange them just before eating.
- Here's a set for moving a birthday cake for reference. I put the decoration cookies ("HAPPY BIRTHDAY" and name) in a separate container from the main cake.
- I even made a Christmas train. - - https://cookpad.com/us/recipes/147711-christmas-2007-cookie-train
- Here are some Christmas decorations.
- Here's my Christmas in 2009. - - https://cookpad.com/us/recipes/147720-a-lit-up-decorative-cookie-house-for-christmas
- I decorated a plain sponge cake with a boy for the children's day celebration in Japan.
So that’s going to wrap it up with this special food mama's golden recipe: basic cut-out cookies recipe. Thanks so much for reading. I am confident you will make this at home. There’s gonna be more interesting food in home recipes coming up. Don’t forget to save this page in your browser, and share it to your loved ones, colleague and friends. Thank you for reading. Go on get cooking!